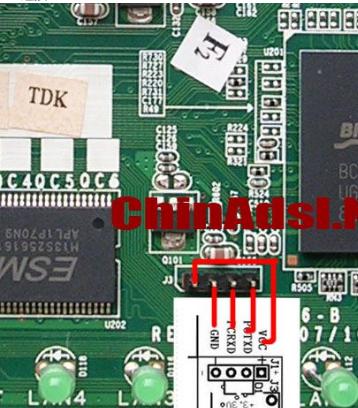
wr842n 缩水很严重, 把ram拆下来改成64MB , flash 改成25Q128 16m 版本, 当然,芯片要用编程序写入breed, 然后再焊上去, 结果写入固件后不断重启, 查来查去 ,原来没有烧入art 文件

art 是无线部分的特性参数的文件,网上做breed的大神有, 我是下载来的,我提供一份把,这里

原链接在这里

在breed 中更新qca9533的art文件后,正常启动.

固件?
固件就是opwnwrt 官网固件,我写入是18.XX版本, 我是用来做MTQQ server 的, 所以其他功能没有测试.

ssmtp 是一个简单发邮件工具,

配置/etc/ssmtp/ssmtp.conf

1
2
3
4
5
6
7
8
9
10
11
12
13
14
15
16
17
18
19
20
21
22
23
24
25
26
27
28
29
30
31
32
33
34
35
36
37
38
39
40
41
42
43
44
45
46
47
48
#
# /etc/ssmtp.conf -- a config file for sSMTP sendmail.
#

# The person who gets all mail for userids < 1000
# Make this empty to disable rewriting.
root=robot123456@kaudioxxyyzz.net

# The place where the mail goes. The actual machine name is required
# no MX records are consulted. Commonly mailhosts are named mail.domain.com
# The example will fit if you are in domain.com and your mailhub is so named.
mailhub=smtp.kaudioxxyyzz.net

# Example for SMTP port number 2525
# mailhub=mail.your.domain:2525
# Example for SMTP port number 25 (Standard/RFC)
# mailhub=mail.your.domain
# Example for SSL encrypted connection
# mailhub=mail.your.domain:465

# Where will the mail seem to come from?
rewriteDomain=kaudioxxyyzz.net

# The full hostname
hostname=kaudioxxyyzz.net

# Set this to never rewrite the "From:" line (unless not given) and to
# use that address in the "from line" of the envelope.
FromLineOverride=YES

# Use SSL/TLS to send secure messages to server.
#UseTLS=YES

# Use SSL/TLS certificate to authenticate against smtp host.
#UseTLSCert=YES

# Use this RSA certificate.
#TLSCert=/etc/ssl/certs/ssmtp.pem

# Get enhanced (*really* enhanced) debugging information in the logs
# If you want to have debugging of the config file parsing, move this option
# to the top of the config file and uncomment
#Debug=YES


AuthUser=robot1234576@kaudioxxyyzz.net
AuthPass=pw

/etc/ssmtp/revaliases

1
2
3
4
5
6
7
8
9
# sSMTP aliases
#
# Format: local_account:outgoing_address:mailhub
#
# Example: root:your_login@your.domain:mailhub.your.domain[:port]
# where [:port] is an optional port number that defaults to 25.

root:robot1111111@kaudiofdsafasd.net:smtp.kaudioafsdfasdf.net

原文章在

不过我尝试安装openwrt 路由器上

首先openwrt 的路由器空间必须大,我是安装在u盘上的,可能要10M左右空间 ,python安装也占不少空间.

程序中用到阿里云的库, aliyunsdkcore 和aliyunsdkalidns , 之前有人用pip 安装,但是openwrt 上不能, 所以下载其源码,然后解压后, 把里面核心代码复制到 /usr/lib/python2.7/XXXX (后面路径不记得) ,我看见别人自己提取相关几个文件,放在当前目录也可以.

update_ip.py 这个基本上来自前面那个文章,只不过我因为跑在openwrt上, 所以我改了获取ip的方式,改有get_ip这个脚本获取.

1
2
3
4
5
6
7
8
9
10
11
12
13
14
15
16
17
18
19
20
21
22
23
24
25
26
27
28
29
30
31
32
33
34
35
36
37
38
39
40
41
42
43
44
45
46
47
48
49
50
51
52
53
54
55
56
57
58
59
60
61
62
63
64
65
66
67
68
69
70
71
72
73
74
75
76
77
78
79
80
81
82
83
84
85
86
87
88
89
90
91
92
93
94
95
96
97
98
99
100
101
102
103
104
105
#!/usr/bin/env python
# coding= utf-8

import subprocess
import os
import json
#from urllib2 import urlopen
from aliyunsdkcore.client import AcsClient
from aliyunsdkcore.acs_exception.exceptions import ClientException
from aliyunsdkcore.acs_exception.exceptions import ServerException
from aliyunsdkalidns.request.v20150109 import DescribeDomainRecordsRequest
from aliyunsdkalidns.request.v20150109 import UpdateDomainRecordRequest

class DnsHandler:
# 从阿里云开发者后台获取Access_Key_Id和Access_Key_Secret
access_key_id = ""
access_key_secret = ""
region_id = "cn-hangzhou"


# 填入自己的域名
domain_name = ""
# 填入二级域名的RR值
rr_keyword = ""

# 解析记录类型,一般为A记录
record_type = "A"

# 用于储存解析记录的文件名
file_name = ".ip_addr"

client = None
record = None
current_ip = ''

# 初始化,获取client实例
def __init__(self):
self.client = AcsClient(
self.access_key_id,
self.access_key_secret,
self.region_id
)
self.record = self.get_record()
self.current_ip = self.get_current_ip()

# 如果公网IP发生变化,则自动修改阿里云解析记录
def reset(self):
if self.current_ip <> self.get_record_value():
# print self.current_ip
print self.update_record(self.current_ip)
self.get_record()

# 获取阿里云域名解析完整记录,并使用文件缓存
def get_record(self):
if os.path.isfile(self.file_name) :
file_handler = open(self.file_name, 'r')
r = file_handler.read()
file_handler.close()
else :
request = DescribeDomainRecordsRequest.DescribeDomainRecordsRequest()
request.set_PageSize(10)
request.set_action_name("DescribeDomainRecords")
request.set_DomainName(self.domain_name)
request.set_RRKeyWord(self.rr_keyword)
request.set_TypeKeyWord(self.record_type)
r = self.client.do_action_with_exception(request)
file_handler = open(self.file_name, 'w')
file_handler.write(r)
file_handler.close()
return json.loads(r)

# 获取阿里云域名解析记录ID
def get_record_id(self) :
return self.record["DomainRecords"]["Record"][0]["RecordId"]

# 获取当前域名解析记录
def get_record_value(self) :
return self.record["DomainRecords"]["Record"][0]["Value"]

# 修改阿里云解析记录
def update_record(self, value):
request = UpdateDomainRecordRequest.UpdateDomainRecordRequest()
request.set_action_name("UpdateDomainRecord")
request.set_RecordId(self.get_record_id())
request.set_Type(self.record_type)
request.set_RR(self.rr_keyword)
request.set_Value(value)
return self.client.do_action_with_exception(request)

# 获取当前公网IP
def get_current_ip(self):
#ip,retcode=os.system('./get_ip')
out_bytes=subprocess.check_output('/root/get_ip')
out_text= out_bytes.decode('utf8')
out_text=out_text.replace("\n","")
#print out_text
#out_text.replace("\n","").replace("\r","")
return out_text
# //json.load(urlopen('http://jsonip.com'))['ip'


# 实例化类并启动更新程序
dns = DnsHandler()
dns.reset()

1
2
3
4
5
6
7
8
9

#!/bin/sh
# check ip change and update it

ip_regex="[0-9]\{1,3\}\.[0-9]\{1,3\}\.[0-9]\{1,3\}\.[0-9]\{1,3\}"

ipaddr=$(ifconfig pppoe-wan | awk '/inet /{print $2}' |grep -o "$ip_regex" )

echo $ipaddr

然后加到cron 里面
*/15 * * * * python /root/update_ip.py

1.拆开接上串口,见以前的图,打开串口,重启rg100a,按回车,让其不要启动linux,在cfe控制界面停下来。
2.接上网络,登录192.168.1.1.

3,输入下面中的其中一个用户密码登录进去。

USER=telecomadmin pass=telecomadmin 2:user=telecomadmin pass=nE7jA%5m 3:user=bjcnchgw pass=8mCnC@bj

  1. 上次文件,更新系统。在串口哪里,可以看到更新过程,然后自动重启。

rg100_comm

R206,R207,R208,R209各焊上4.7K贴片电阻。成功超频400MHZ

Volumio 没有对应的Zero 的版本,但是又lite 板 ,Lite 是H3 cpu , 和H2 的Zero相比应该是可以运行的, 在volumio的论坛上又lite版的移植

在这里volumio for orangepi

Orange Pi Zero
烧入SD启动就可以, 设置里面选择I2S-master, 我用的是PCM5102的DA 底噪不明显,示波器看BCK 不稳 , Allwinner 的CPU就这个德行? 怎么做Hifi 啊?? 不知树莓派如何.

勉强先用.
volumio 运行界面
另外一个要命的问题, volumio是utf8, mount nas的时候也是utf8 .
这也算了, ssh登录后台,手动mount cifs -o charset=cp936 竟然不能正常mount, 不知为何.

所以有些中文文件名无法显示,有些却正常,不知为何, 另外最麻烦的是ape文件中的cue文件,里面全是gb2312的,在volumio里面全部乱码.这怎么用啊?
我的volumio

新做的blog 不知道好不好, 先试试, 但是存在一个问题,这个blog 要hexo 支持, 如果在另外一台电脑 , 那不是写不了?