之前淋花, 控制灯的开关 都是nodemcu 做的,但是都是基于cron服务. 也就是定时服务. 定时服务简单,就是一个缺点,有时候这些东西要修改的时候比较麻烦, 要接上串口修改, 不接上串口 ,用telnet 去改也就可以但是总没那么直观,很容易出错而不知.

上去家中花严重缺水, 原来上次淋花器的一个程序有问题, 自己修改的时候不够细心,出错,倒是一个多月缺水, 于是下定决心修改一下.

现在把所有控制器都改到用mqtt协议连接到mqtt server上面, mqtt server 是自己搭建的. 运行在一个openwrt路由器上, 域名是阿里云域名,然后自己动态更新. 电信网络有公网IP ,于是就有了一些列的服务.

nodemcu 连接到mqtt server 上面,然后所有动作,都由服务器的cron 服务统一操作. 这样随时可以修改动作的时间,内容. 方便多了. 具体来说, 而且还可以根据当天天气清空改变淋花次数, 改变喂鱼机投喂次数, 比如天气寒冷,停止投喂.

代码
init.lua

1
2
3
4
5
6
7
8
9
10
11
12
13
14
15
16
17
18
19
20
21
22
23
24
25
26
27
28
29
30
31
32
33
34
35
36
37
38
39
40
41
42
43
44
45
46
47
48
49
50
51
52
53
54
55
56
57
58
59
60
61
62
63
64
65
66
67
68
69
70
71
72
73
74
75
76
77
78
79
80
81
82
83
84
85
86
87
88
89
90
91
92
93
94
95
96
97
98
99
100
101
102
103
104
105
106
107
--init for water 

gpio.mode(5, gpio.OUTPUT);
--gpio.mode(4, gpio.OUTPUT);
gpio.write(5, gpio.LOW);

station_cfg={}
station_cfg.ssid="sdfasd";
station_cfg.pwd="fasdfa"

-- 标识mqtt是否已经初始化
mqtt_inited = 0

-- 标识mqtt 是否已经连接
mqtt_connecting = 0


function startup()
-- if file.open("init.lua") == nil then
--print("init.lua deleted or renamed")
--else
--print("Running")
--file.close("init.lua")
-- the actual application is stored in 'application.lua'
-- dofile("application.lua")
--end
dofile("synctime.lua");


mdns.register("water", {hardware='NodeMCU'});
print("mdns:water.local/");

print("connecting mqtt server");
dofile("mqtt.lua")
end


-- Define WiFi station event callbacks
wifi_connect_event = function(T)
print("Connection to AP("..T.SSID..") established!")
print("Waiting for IP address...")
if disconnect_ct ~= nil then disconnect_ct = nil end
end

wifi_got_ip_event = function(T)
-- Note: Having an IP address does not mean there is internet access!
-- Internet connectivity can be determined with net.dns.resolve().
print("Wifi connection is ready! IP address is: "..T.IP)
print("Startup will resume momentarily, you have 3 seconds to abort.")
print("Waiting...")
tmr.create():alarm(3000, tmr.ALARM_SINGLE, startup)
end

wifi_disconnect_event = function(T)
if T.reason == wifi.eventmon.reason.ASSOC_LEAVE then
--the station has disassociated from a previously connected AP
return
end
-- total_tries: how many times the station will attempt to connect to the AP. Should consider AP reboot duration.
local total_tries = 5000
print("\nWiFi connection to AP("..T.SSID..") has failed!")

wifi_connetion1=0;

--There are many possible disconnect reasons, the following iterates through
--the list and returns the string corresponding to the disconnect reason.
for key,val in pairs(wifi.eventmon.reason) do
if val == T.reason then
print("Disconnect reason: "..val.."("..key..")")
break
end
end

--if disconnect_ct == nil then
-- disconnect_ct = 1
-- else
--disconnect_ct = disconnect_ct + 1
--end
--if disconnect_ct < total_tries then
-- print("Retrying connection...(attempt "..(disconnect_ct+1).." of "..total_tries..")")
--else
-- wifi.sta.disconnect()
--print("Aborting connection to AP!")
--disconnect_ct = nil
--end
end

-- Register WiFi Station event callbacks
wifi.eventmon.register(wifi.eventmon.STA_CONNECTED, wifi_connect_event)
wifi.eventmon.register(wifi.eventmon.STA_GOT_IP, wifi_got_ip_event)
wifi.eventmon.register(wifi.eventmon.STA_DISCONNECTED, wifi_disconnect_event)

print("Connecting to WiFi access point...")
wifi.setmode(wifi.STATION)
wifi.sta.config(station_cfg)
wifi.sta.autoconnect(1)
-- wifi.sta.connect() not necessary because config() uses auto-connect=true by default


dofile("http.lua");
print("runing http");
dofile("task.lua");
print("runing cron task");
dofile("telnet.lua");
print("runing telnet server");

mqtt.lua

1
2
3
4
5
6
7
8
9
10
11
12
13
14
15
16
17
18
19
20
21
22
23
24
25
26
27
28
29
30
31
32
33
34
35
36
37
38
39
40
41
42
43
44
45
46
47
48
49
50
51
52
53
54
55
56
57
58
59
60
61
62
63
64
65
66
67
68
69
70
71
72
73
74
75
76
77
78
79
80
81
82
83
84
85
86
87
88
89
90
91
92
93
94
95
96
97
98
99
100
101
102
103
104
105
106
107
108
109
110
111
112
113
114
115
116
117


function stopReconnect()
-- clear connecting state and clear connect timer!
mqtt_connecting = 0
tmr.stop(3)
end

-- 重连方法
function reconnect()
if mqtt_connecting == 0 then
tmr.alarm(3, 20000, 1, function()
print("start mqtt server reconnect!")
mq:close()
mq:connect("x.x.x.x", 1883, 0)
end)
mqtt_connecting = 1
end
end


-- 初始化mqtt连接方法
function init()
print("init mqtt")
mqtt_inited = 1
-- 初始化无需登陆的客户端, 心跳时间 120秒
mq = mqtt.Client("recv_earth1", 120)

--mq:lwt("/lwt", "offline", 0, 0)
-- 设置连接ip 以及 端口

-- 对于 TLS: m:connect("192.168.11.118", secure-port, 1)
mq:connect("192.168.1.1", 1883, 0,
function(client)
print("connected")
end,
function(client, reason)
print("failed reason: " .. reason)
reconnect()
end
)

--连接到服务器触发事件
mq:on("connect", function(client)
print("connected")
stopReconnect()
mq:subscribe("tai3_water",0, function(conn) print("subscribe success") end)
--mq:subscribe("rpt_temp",0, function(conn) print("subscribe success") end)

end)


mq:on("offline", function(client)
print ("offline")
reconnect()
end) --掉线触发事件


-- 收到消息时触发事件
mq:on("message", function(client, topic, data)
print(topic .. ":" )
if data ~= nil then
if topic == "tai3_water" then
print(data)
if data == "water1min" then
dofile("water.lua")
--mq:publish("report_info","tai3_water1",0,0)
elseif data == "water2min" then
dofile("water2.lua")
--mq:publish("report_info","tai3_water2",0,0)
elseif data == "water4min" then
dofile("water4.lua")
--mq:publish("report_info","tai3_water4",0,0)
end
end

--if topic == "rpt_water" and tonumber(data) > 12 then
--print("aaa"..data)
--end

end
end)

end


--function do_get_adc() -- 定义定时器处理函数
--mq:publish("rpt_water", adc.read(0), 0, 0)
--end

--tmr.create():alarm(60000, tmr.ALARM_AUTO , do_get_adc)

-- 确保subscribe/publish方法在连接上服务器后再调用,在实际应用中是把他们放在connect回调函数里或者确定连接成功

-- 订阅/topic主题、服务质量为0
--m:subscribe("topicxx",0, function(conn) print("subscribe success") end)
--m:subscribe("blinkdr",0, function(conn) print("subscribe success") end)
-- 发送一条信息 data = hello, QoS = 0, retain = 0

--m:close();
-- 你可以再次调用 m:connect 连接函数


-- 如果没有初始化过,进行初始化
if mqtt_inited == 0 then
init()
else
reconnect()
end

synctime.lua

1
2
3
4
5
6
7
8
9
10
11
12
13
14
15
16
17
local tm
local sec

sec=rtctime.get();
rtctime.set(0);
sntp.sync("ntp1.aliyun.com",
function() -- success
rtctime.set(rtctime.get() + 8*3600 , 0)
tm = rtctime.epoch2cal(rtctime.get())
print(string.format("%04d/%02d/%02d %02d:%02d:%02d", tm["year"], tm["mon"], tm["day"], tm["hour"], tm["min"], tm["sec"]))
end,
function() -- fail
rtctime.set(sec);
print("fail!");
end

)

task.lua

1
2
3
4
5
6
7
8
9
10
11
12
13
14
15
16
17
18
19
20
21
22
23
24
25
26
27
28
29
30
31
32
33
34
35
36
37
38
39
40
41
42
cron.schedule("1 5 */2 * *", function(e)
dofile("synctime.lua");
end)

--cron.schedule("*/15 * * * *", function(e)
-- dofile("imap_read.lua");
--end)


cron.schedule("1 8 * * *", function(e)
if mqtt_connecting == 1 then
dofile("water2.lua");
end
end)

--cron.schedule("1 9 * * *", function(e)
-- dofile("water.lua");
--end)


cron.schedule("1 11 * * *", function(e)
if mqtt_connecting == 1 then
dofile("water2.lua");
end
end)


--cron.schedule("1 12 * * *", function(e)
-- dofile("water.lua");
--end)


cron.schedule("30 17 * * *", function(e)
if mqtt_connecting == 1 then
dofile("water2.lua");
end
end)


--cron.schedule("30 18 * * *", function(e)
--dofile("water.lua");
--end)
1
2
3
4
5
6
7
8
9
10
11
12
13
14
15
16
17
18
19
20
21
22
23
24
25
26
27
28
29
30
#!/bin/sh

# check ip change and update it


ip_regex="[0-9]\{1,3\}\.[0-9]\{1,3\}\.[0-9]\{1,3\}\.[0-9]\{1,3\}"


ipaddr=$(ifconfig pppoe-wan | awk '/inet /{print $2}' |grep -o "$ip_regex" )

old_ipaddr=$(ping -c 1 kang.ddns.info|head -1 | grep -o "$ip_regex")


if [ "$ipaddr" != "$old_ipaddr" ];then


# 发邮件
echo "Subject:$ipaddr" | ssmtp -v robot12123@334343.net

# 更新
wget -q -O /tmp/ddns --no-check-certificate 'https://nic.changeip.com/nic/update?u=XXX&p=XXX&hotname=kk'


fi

wr842n 缩水很严重, 把ram拆下来改成64MB , flash 改成25Q128 16m 版本, 当然,芯片要用编程序写入breed, 然后再焊上去, 结果写入固件后不断重启, 查来查去 ,原来没有烧入art 文件

art 是无线部分的特性参数的文件,网上做breed的大神有, 我是下载来的,我提供一份把,这里

原链接在这里

在breed 中更新qca9533的art文件后,正常启动.

固件?
固件就是opwnwrt 官网固件,我写入是18.XX版本, 我是用来做MTQQ server 的, 所以其他功能没有测试.

ssmtp 是一个简单发邮件工具,

配置/etc/ssmtp/ssmtp.conf

1
2
3
4
5
6
7
8
9
10
11
12
13
14
15
16
17
18
19
20
21
22
23
24
25
26
27
28
29
30
31
32
33
34
35
36
37
38
39
40
41
42
43
44
45
46
47
48
#
# /etc/ssmtp.conf -- a config file for sSMTP sendmail.
#

# The person who gets all mail for userids < 1000
# Make this empty to disable rewriting.
root=robot123456@kaudioxxyyzz.net

# The place where the mail goes. The actual machine name is required
# no MX records are consulted. Commonly mailhosts are named mail.domain.com
# The example will fit if you are in domain.com and your mailhub is so named.
mailhub=smtp.kaudioxxyyzz.net

# Example for SMTP port number 2525
# mailhub=mail.your.domain:2525
# Example for SMTP port number 25 (Standard/RFC)
# mailhub=mail.your.domain
# Example for SSL encrypted connection
# mailhub=mail.your.domain:465

# Where will the mail seem to come from?
rewriteDomain=kaudioxxyyzz.net

# The full hostname
hostname=kaudioxxyyzz.net

# Set this to never rewrite the "From:" line (unless not given) and to
# use that address in the "from line" of the envelope.
FromLineOverride=YES

# Use SSL/TLS to send secure messages to server.
#UseTLS=YES

# Use SSL/TLS certificate to authenticate against smtp host.
#UseTLSCert=YES

# Use this RSA certificate.
#TLSCert=/etc/ssl/certs/ssmtp.pem

# Get enhanced (*really* enhanced) debugging information in the logs
# If you want to have debugging of the config file parsing, move this option
# to the top of the config file and uncomment
#Debug=YES


AuthUser=robot1234576@kaudioxxyyzz.net
AuthPass=pw

/etc/ssmtp/revaliases

1
2
3
4
5
6
7
8
# sSMTP aliases
#
# Format: local_account:outgoing_address:mailhub
#
# Example: root:your_login@your.domain:mailhub.your.domain[:port]
# where [:port] is an optional port number that defaults to 25.

root:robot1111111@kaudiofdsafasd.net:smtp.kaudioafsdfasdf.net

原文章在

不过我尝试安装openwrt 路由器上

首先openwrt 的路由器空间必须大,我是安装在u盘上的,可能要10M左右空间 ,python安装也占不少空间.

程序中用到阿里云的库, aliyunsdkcore 和aliyunsdkalidns , 之前有人用pip 安装,但是openwrt 上不能, 所以下载其源码,然后解压后, 把里面核心代码复制到 /usr/lib/python2.7/XXXX (后面路径不记得) ,我看见别人自己提取相关几个文件,放在当前目录也可以.

update_ip.py 这个基本上来自前面那个文章,只不过我因为跑在openwrt上, 所以我改了获取ip的方式,改有get_ip这个脚本获取.

1
2
3
4
5
6
7
8
9
10
11
12
13
14
15
16
17
18
19
20
21
22
23
24
25
26
27
28
29
30
31
32
33
34
35
36
37
38
39
40
41
42
43
44
45
46
47
48
49
50
51
52
53
54
55
56
57
58
59
60
61
62
63
64
65
66
67
68
69
70
71
72
73
74
75
76
77
78
79
80
81
82
83
84
85
86
87
88
89
90
91
92
93
94
95
96
97
98
99
100
101
102
103
104
#!/usr/bin/env python
# coding= utf-8

import subprocess
import os
import json
#from urllib2 import urlopen
from aliyunsdkcore.client import AcsClient
from aliyunsdkcore.acs_exception.exceptions import ClientException
from aliyunsdkcore.acs_exception.exceptions import ServerException
from aliyunsdkalidns.request.v20150109 import DescribeDomainRecordsRequest
from aliyunsdkalidns.request.v20150109 import UpdateDomainRecordRequest

class DnsHandler:
# 从阿里云开发者后台获取Access_Key_Id和Access_Key_Secret
access_key_id = ""
access_key_secret = ""
region_id = "cn-hangzhou"


# 填入自己的域名
domain_name = ""
# 填入二级域名的RR值
rr_keyword = ""

# 解析记录类型,一般为A记录
record_type = "A"

# 用于储存解析记录的文件名
file_name = ".ip_addr"

client = None
record = None
current_ip = ''

# 初始化,获取client实例
def __init__(self):
self.client = AcsClient(
self.access_key_id,
self.access_key_secret,
self.region_id
)
self.record = self.get_record()
self.current_ip = self.get_current_ip()

# 如果公网IP发生变化,则自动修改阿里云解析记录
def reset(self):
if self.current_ip <> self.get_record_value():
# print self.current_ip
print self.update_record(self.current_ip)
self.get_record()

# 获取阿里云域名解析完整记录,并使用文件缓存
def get_record(self):
if os.path.isfile(self.file_name) :
file_handler = open(self.file_name, 'r')
r = file_handler.read()
file_handler.close()
else :
request = DescribeDomainRecordsRequest.DescribeDomainRecordsRequest()
request.set_PageSize(10)
request.set_action_name("DescribeDomainRecords")
request.set_DomainName(self.domain_name)
request.set_RRKeyWord(self.rr_keyword)
request.set_TypeKeyWord(self.record_type)
r = self.client.do_action_with_exception(request)
file_handler = open(self.file_name, 'w')
file_handler.write(r)
file_handler.close()
return json.loads(r)

# 获取阿里云域名解析记录ID
def get_record_id(self) :
return self.record["DomainRecords"]["Record"][0]["RecordId"]

# 获取当前域名解析记录
def get_record_value(self) :
return self.record["DomainRecords"]["Record"][0]["Value"]

# 修改阿里云解析记录
def update_record(self, value):
request = UpdateDomainRecordRequest.UpdateDomainRecordRequest()
request.set_action_name("UpdateDomainRecord")
request.set_RecordId(self.get_record_id())
request.set_Type(self.record_type)
request.set_RR(self.rr_keyword)
request.set_Value(value)
return self.client.do_action_with_exception(request)

# 获取当前公网IP
def get_current_ip(self):
#ip,retcode=os.system('./get_ip')
out_bytes=subprocess.check_output('/root/get_ip')
out_text= out_bytes.decode('utf8')
out_text=out_text.replace("\n","")
#print out_text
#out_text.replace("\n","").replace("\r","")
return out_text
# //json.load(urlopen('http://jsonip.com'))['ip'


# 实例化类并启动更新程序
dns = DnsHandler()
dns.reset()
1
2
3
4
5
6
7
8
9

#!/bin/sh
# check ip change and update it

ip_regex="[0-9]\{1,3\}\.[0-9]\{1,3\}\.[0-9]\{1,3\}\.[0-9]\{1,3\}"

ipaddr=$(ifconfig pppoe-wan | awk '/inet /{print $2}' |grep -o "$ip_regex" )

echo $ipaddr

然后加到cron 里面
*/15 * * * * python /root/update_ip.py

1.拆开接上串口,见以前的图,打开串口,重启rg100a,按回车,让其不要启动linux,在cfe控制界面停下来。
2.接上网络,登录192.168.1.1.

3,输入下面中的其中一个用户密码登录进去。

USER=telecomadmin pass=telecomadmin 2:user=telecomadmin pass=nE7jA%5m 3:user=bjcnchgw pass=8mCnC@bj

  1. 上次文件,更新系统。在串口哪里,可以看到更新过程,然后自动重启。

rg100_comm

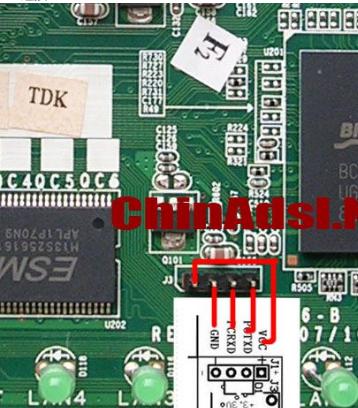
R206,R207,R208,R209各焊上4.7K贴片电阻。成功超频400MHZ

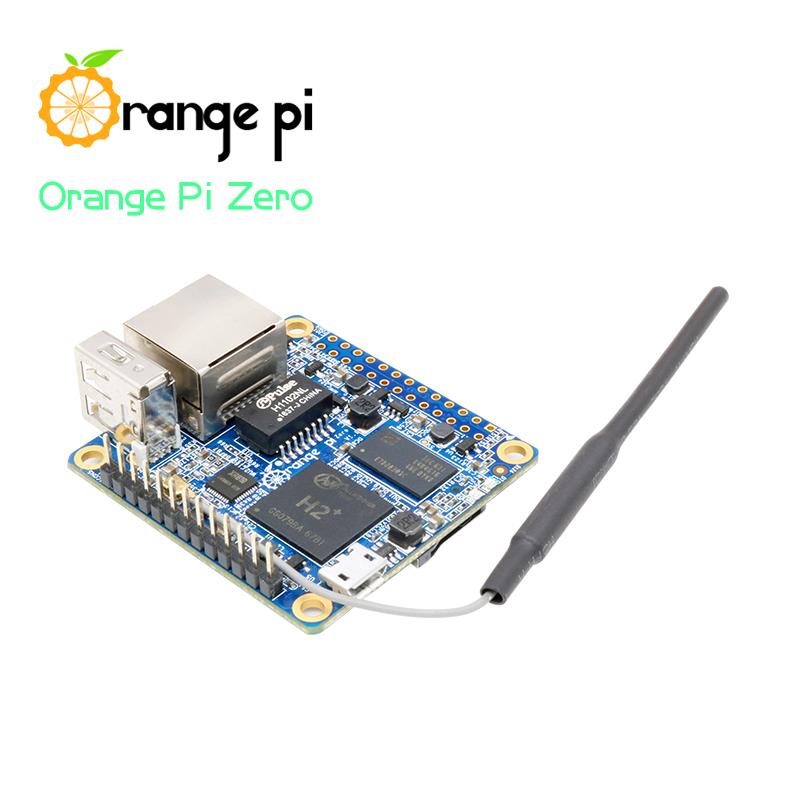
Volumio 没有对应的Zero 的版本,但是又lite 板 ,Lite 是H3 cpu , 和H2 的Zero相比应该是可以运行的, 在volumio的论坛上又lite版的移植

在这里volumio for orangepi

Orange Pi Zero
烧入SD启动就可以, 设置里面选择I2S-master, 我用的是PCM5102的DA 底噪不明显,示波器看BCK 不稳 , Allwinner 的CPU就这个德行? 怎么做Hifi 啊?? 不知树莓派如何.

勉强先用.
volumio 运行界面
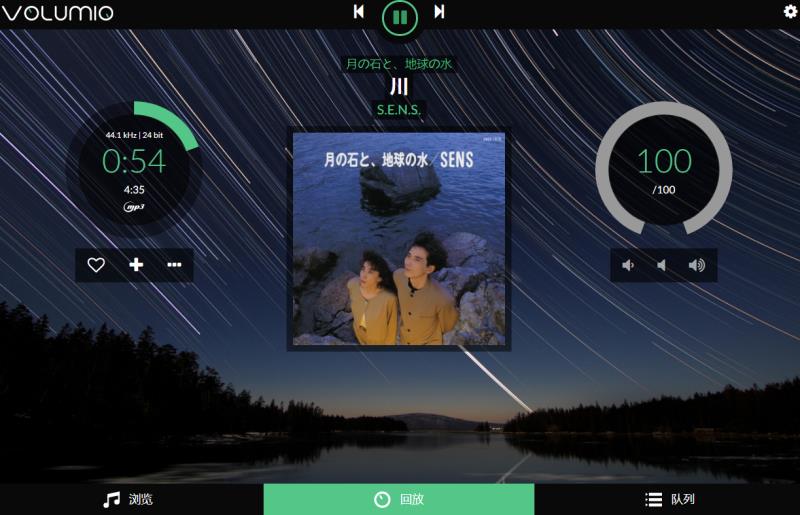
另外一个要命的问题, volumio是utf8, mount nas的时候也是utf8 .
这也算了, ssh登录后台,手动mount cifs -o charset=cp936 竟然不能正常mount, 不知为何.

所以有些中文文件名无法显示,有些却正常,不知为何, 另外最麻烦的是ape文件中的cue文件,里面全是gb2312的,在volumio里面全部乱码.这怎么用啊?
我的volumio

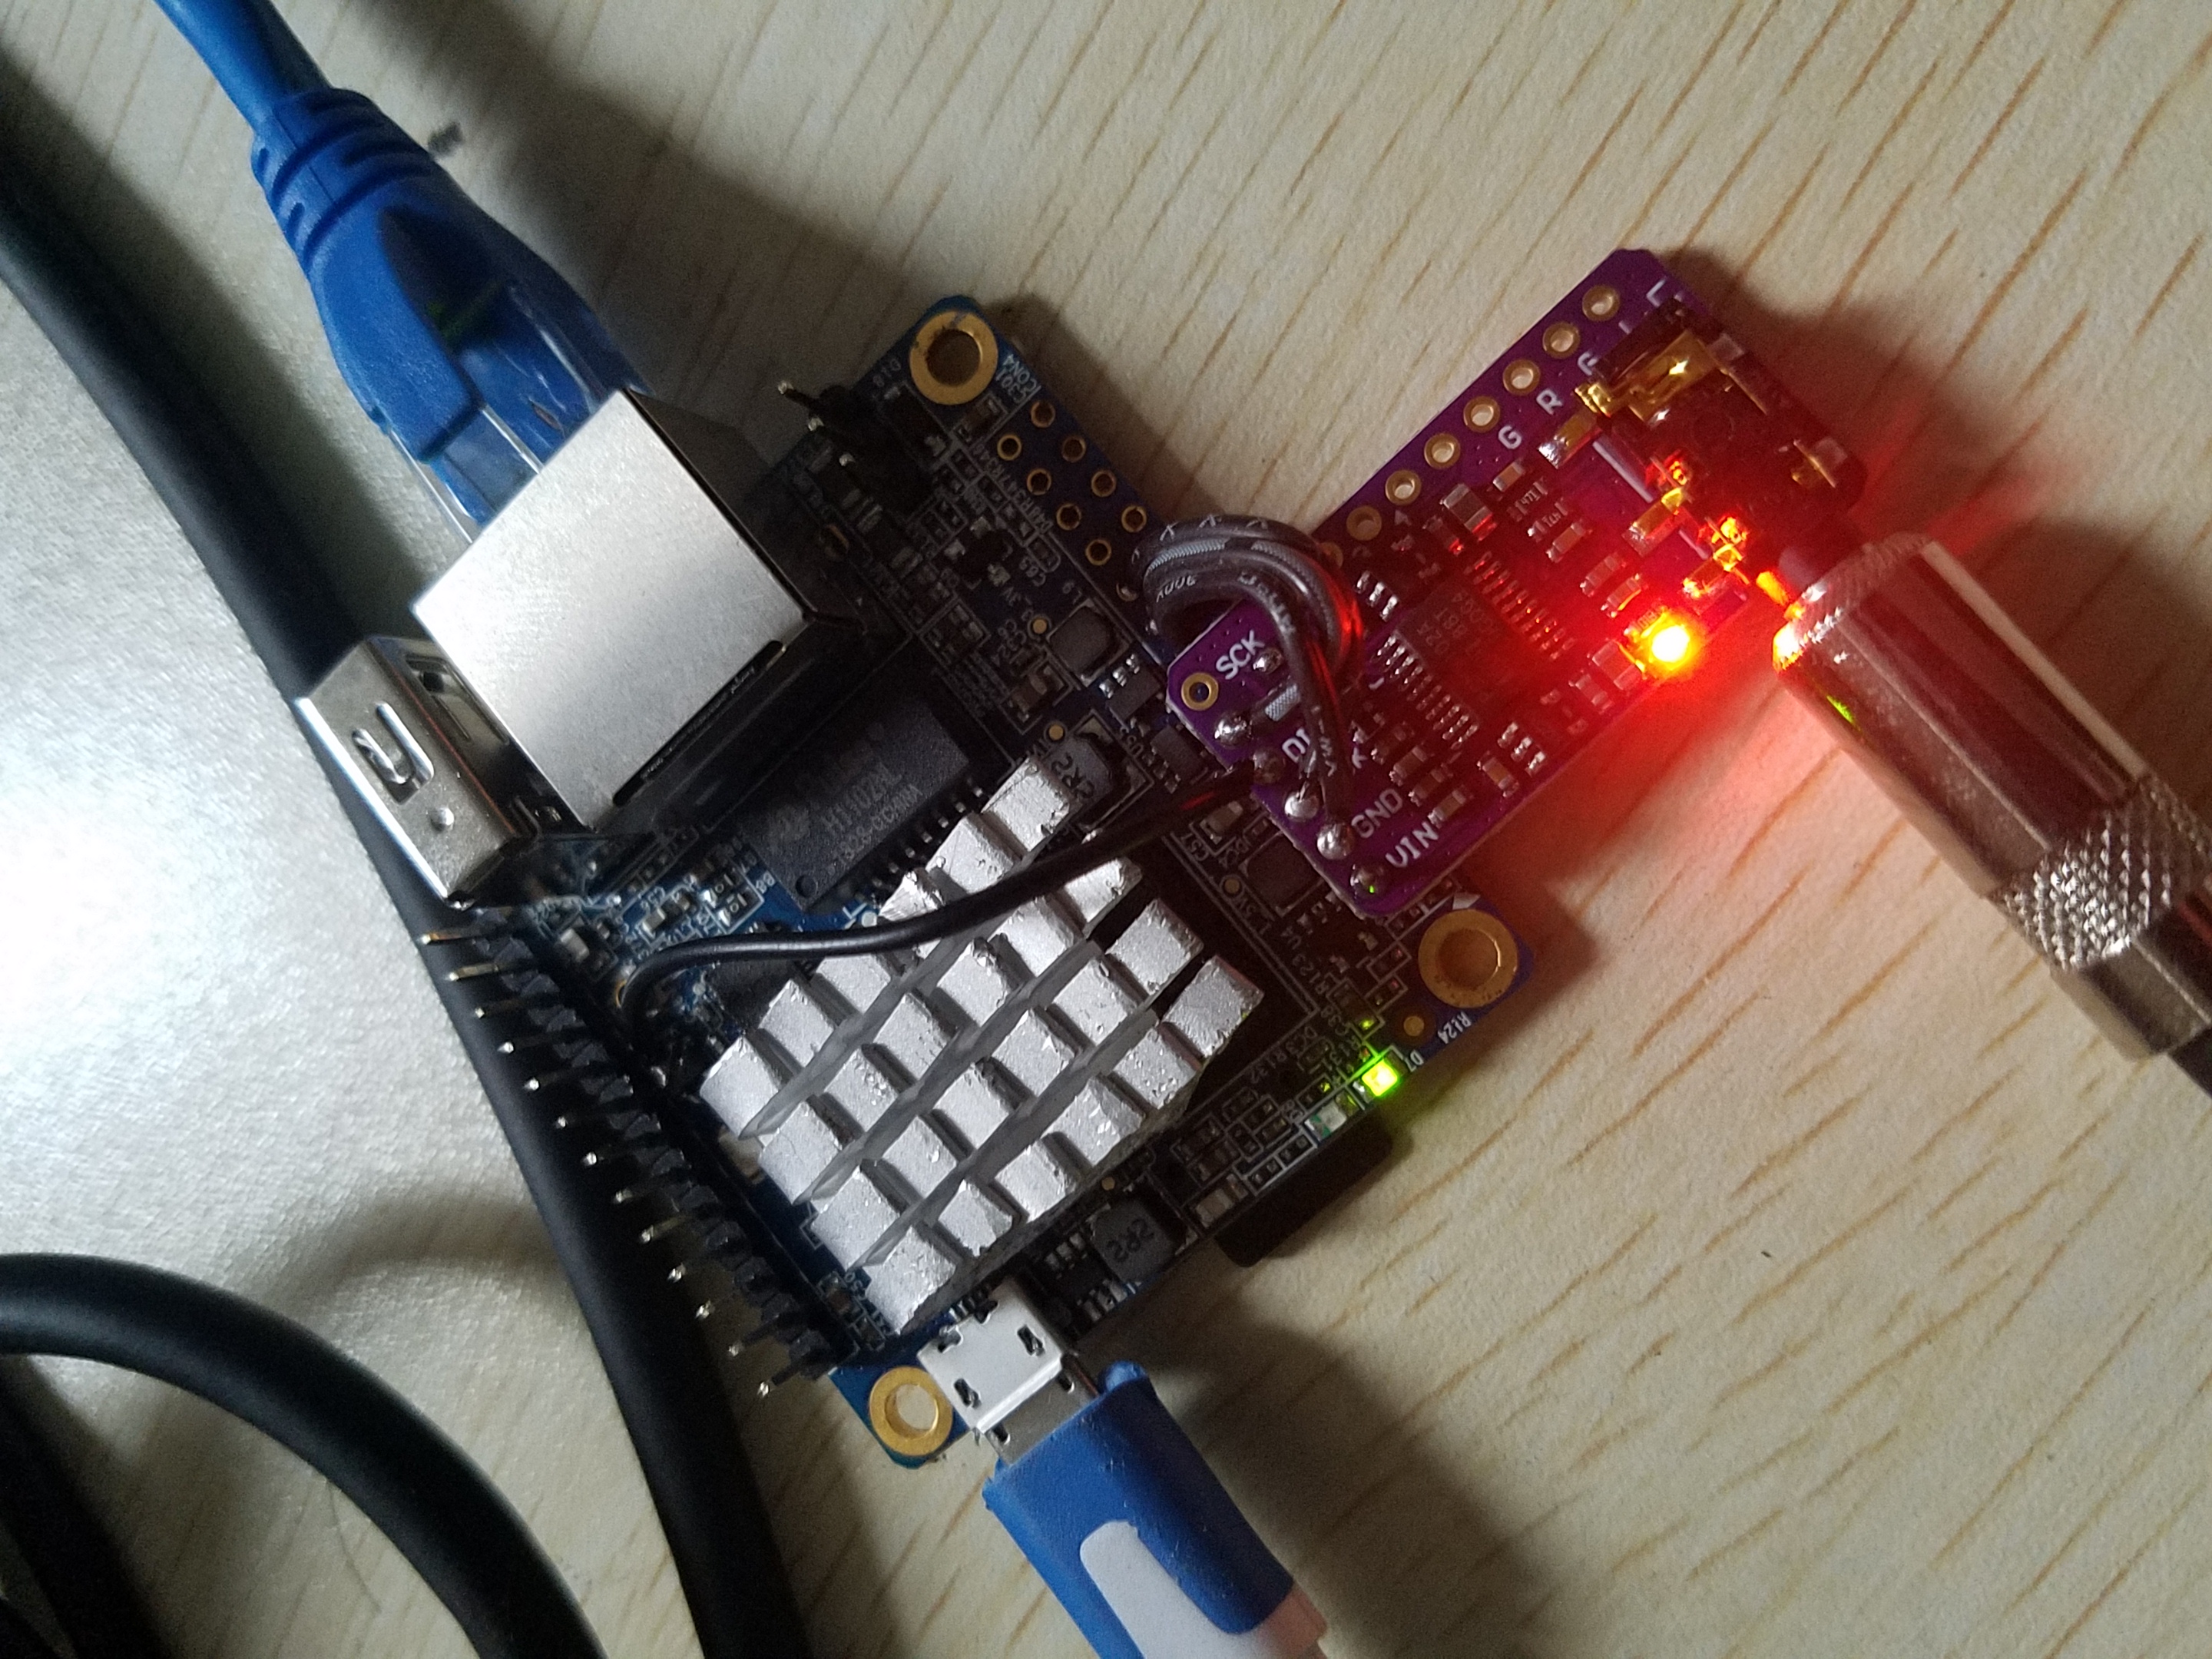
新做的blog 不知道好不好, 先试试, 但是存在一个问题,这个blog 要hexo 支持, 如果在另外一台电脑 , 那不是写不了?